Working with Annotation
Part I: Create map document annotation
As the GIS
technician for
In this
exercise, you'll create and edit map document annotation.
Estimated
time to complete: 30 minutes
Step 1 Start ArcMap and open a map
document
Start
ArcMap.
Navigate
to your Lab14 folder and open Everglades.mxd.
Step 1: Start ArcMap and open a map
document.
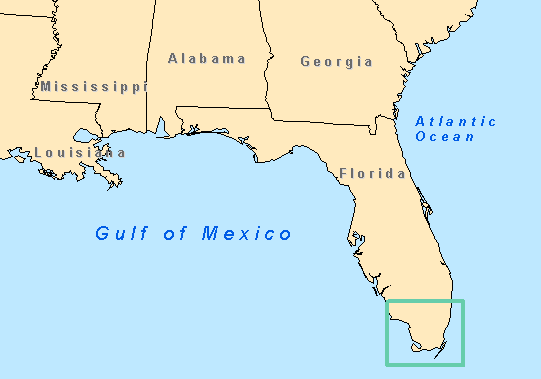
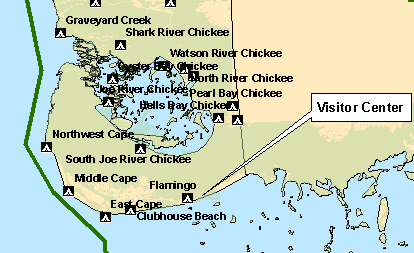
The map
shows the southeastern
Step 2 Add map document annotation
In earlier
exercises, you created callouts. In one case, you modified labeling properties
for dynamic labels. In another, the callout (remember
Gadsden Point?) was not based on an attribute. In this step, you will also
create annotation that is not based on an attribute and learn where it is
stored.
If you
happen to have ArcToolbox open, close it because it
will affect how your map displays.
Maximize
the ArcMap window then zoom to the
Step 2a: Add map document
annotation.
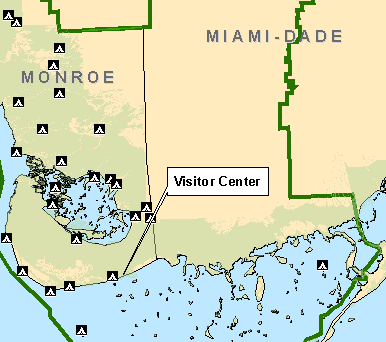
You see
several campgrounds, including some in the islands of the
You want
to label the campground features as well as a visitor center that is not
associated with any layer.
You'll
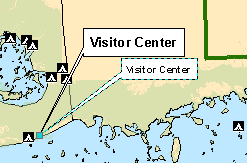
first add a callout for the visitor center.
On the
Draw toolbar, click the dropdown arrow next to the New Text ![]() tool then click the Callout tool
tool then click the Callout tool
![]() .
.
Click the
map near the campground that's along the shore and about 10,000 meters west of
the
Don't
worry if your callout's location is not exact. One advantage of annotation is
that, unlike dynamic labels, you can modify both the text and the position of
annotation.
Enter
Drag the
callout to an empty space inside the
Click in
the blue area to unselect the callout.
Step 2b: Add map document
annotation.
In the
previous lab, you learned that manually-created descriptive text like your
To view
the annotation groups for your ArcMap document, open the properties for the
Step 2c: Add map document
annotation.
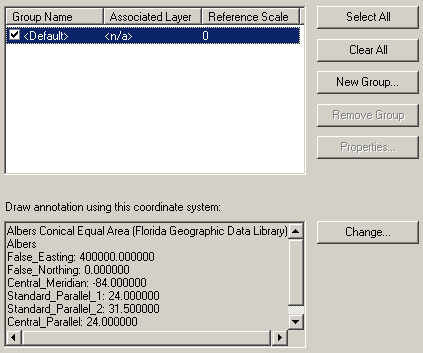
You see a
single annotation group, Default, which is turned on. Notice the Remove Group
and Properties buttons are disabled. Unlike a Default label class that can be
renamed and even deleted, the Default annotation group cannot be removed or
renamed. Also notice, the Default annotation group inherits its coordinate
system from the data frame.
Even
though you might not have known it, you added the
Slide the
Data Frame Properties dialog to one side to expose the
Uncheck
Default then click Apply.
The map
refreshes but the
Check
Default to turn it on again.
If you do
not take special action, the Default annotation group can easily become the
repository for map document annotation that you add with the text tools.
So, it's
good practice to organize your map documentation into annotation groups that
you create. However, if you inadvertently save a piece of map document
annotation in the Default group, you can always move it to another annotation
group later.
Next,
you'll move the
Click New
Group. In the dialog that opens, type
Step 2d: Add map document
annotation.
Click OK
to close the New Annotation Group dialog.
Step 2e: Add map document
annotation.
Although
there is no feature for the visitor center, it is a part of
Click
Properties.
Step 2f: Add map document
annotation.
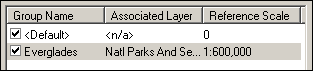
In the
Associated Layer dropdown list, select
Note: Although you are associating the annotation group with a layer,
the annotation group is still stored with the map document and does not become
a property of the layer.
Like you
did for dynamic labels, you'll want to set a reference scale for map document
annotation.
Change the
reference scale to 1:600000 (600,000).
Step 2g: Add map document
annotation.
Click OK
to close the Annotation Group Properties dialog.
Step 2h: Add map document
annotation.
By
default, your new annotation group is turned on.
Note: When you want to modify existing annotation on a map, you need
to make sure that both the Default annotation group and the target annotation
group you want to edit are turned on. You will not be able to edit annotation
in any of the other groups if the Default group is not visible.
Click OK
to close the Data Frame Properties dialog.
Now,
you're ready to move your callout to the new annotation group. So you can
compare results, you'll actually copy from one annotation group to the other.
Using the
Select Elements tool ![]() ,
select the
,
select the
Right-click
the callout then click Copy.
Note: You can also choose Copy from the Edit menu.
From the
Drawing menu, point to Active Annotation Target, then
click
From the
Edit menu, choose Paste.
Step 2i: Add map document
annotation.
By design,
the new callout is offset slightly to the right and below the position of the
original callout. This is a way for you to confirm that the paste completed
successfully. The same behavior also applies to Cut and Paste.
![]() 1 Why does the size of the new callout differ
from the original?
1 Why does the size of the new callout differ
from the original?
Select the
original graphic and delete it.
Turn the
Note: If you turn off the Everglades annotation group, your
You've now
learned one way to create map document annotation. In the next step, you'll
discover another technique for creating this type of annotation.
Step 3 Convert labels to annotation
Dynamic
labels are ideal for developing an application quickly. Labeling lets you
experiment with placement options and preview how text looks on the map. You've
already managed labels by creating label classes and setting properties for
each label class. Labeling can also give you a jumpstart on annotation. So,
what can you do when you want to control the placement of labels individually?
One option is to convert your dynamic labels to map document annotation.
In the
previous step, you used one of the text tools to create new annotation that was
not based on an attribute. In this step, you'll create annotation that is based
on an attribute.
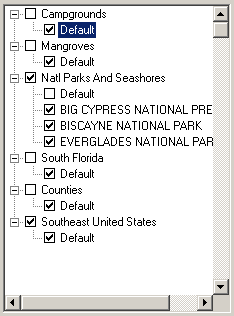
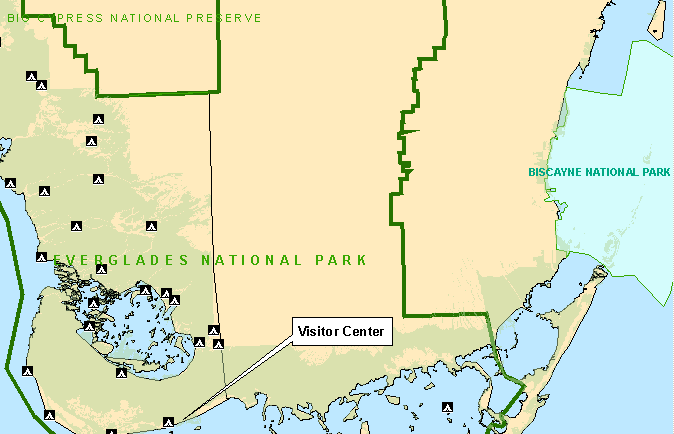
You'll
begin by labeling the region's national parks. There are only three parks, but
each has been set up in advance to be symbolized separately and, thus, is in a
separate label class.
On the
Standard toolbar, set the map scale to 1:600,000 then set the data frame
reference scale.
To do
this, right-click the data frame name in the Table of Contents, point to
Reference Scale, and click Set Reference Scale.
This is
the reference scale for your labels. When you created dynamic labels, you first
needed to set the reference scale. You also want to be sure to set the scale
before you convert your labels to annotation.
From the
Labeling toolbar, open the Label Manager ![]() then examine labeling properties for
then examine labeling properties for
Turn on
labeling for
Turn off
labeling for Counties.
Step 3a: Convert labels to
annotation.
Click OK
to close the Label Manager.
Step 3b: Convert labels to
annotation.
The
polygons for the three parks are irregularly shaped and the text strings for
the labels are long. Because of these factors, there are limited placement
possibilities for the dynamic labels in the current extent. You want to place
the labels more precisely and include the entire name of each park. You also
want to avoid overlapping polygon boundaries.
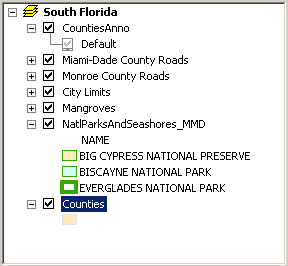
From the ArcMap Table of Contents, right-click Natl
Parks and Seashores. You see that labeling is already enabled because you turned on
labeling in the Label Manager.
Tip: If you have labeled several layers and want to convert all of
those labels to annotation, right-click the data frame.
Click
Convert Labels to Annotation.
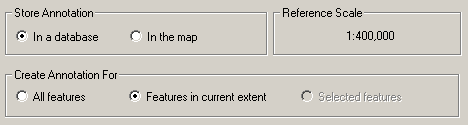
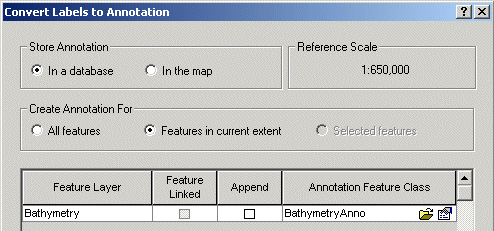
In the
dialog that opens, in the Store Annotation pane, choose In
the map. In the Create Annotation For pane, choose Features in current extent.
There is
no option to set the reference scale because the scale is already set.
Step 3c: Convert labels to
annotation.
Note: When you chose to convert labels for all features to
annotation, ArcMap considers the entire extent of the layer when
converting. Because of this, it is likely that some of your dynamic labels will
move to "best placement" locations during the conversion. In this
exercise, you will convert features using the current extent. Although ArcMap
may still reposition some of the annotation during the conversion, selecting
features in the current extent limits the text that will shift during the
conversion.
To create
the default name for the new annotation group, ArcMap automatically
concatenates a space followed by Anno to the
end of the layer name. The Destination window near the bottom of the dialog
reminds you that this annotation group will be stored in the map document.
Remember
unplaced labels from the prior lab? The checkbox in the lower left corner of
the dialog tells you that, by default, ArcMap will convert any unplaced labels
to unplaced annotation.
Click
Convert.
ArcMap
converts each label to annotation and places it on the map. As part of the
conversion process, ArcMap automatically turns off labeling for the layer. If
it didn't, you would see duplicate labels.
Note: Labels will convert to annotation only for the label classes
that are checked in the Label Manager.
![]() 2 Which layer is associated with the new
annotation group?
2 Which layer is associated with the new
annotation group?
q Default
q Campgrounds
q
q
Hint: Check the data frame properties.
Because
you now have annotation, you will be able to modify each piece individually.
You'll change the appearance of each annotation in the next step.
Step 4 Move annotation
to new locations
Now you
can place your text exactly where you want it.
Select the
annotation for
Drag the
text to the north near the center of the park, so that it is still inside the
park boundary.
Step 4a: Move annotation to new
locations.
Right-click
the annotation for Big Cypress National Preserve and choose Properties then
split the annotation into two lines.
Step 4b: Move annotation to new
locations.
Hint: Depending on your monitor display and the size of the ArcMap
window, your annotation may be in a different position. If you don't see the
annotation, pan until you find it.
Drag the
annotation into the southern portion of the preserve, east of the jagged
boundary.
Modify the
annotation for
Drag the
annotation so that it is roughly centered in the polygon.
Step 4c: Move annotation to new
locations.
Because
you are working with annotation, you are able to situate each piece of
descriptive text individually.
Until now,
you've either added annotation manually or you've converted a handful of labels
and all the labels were placed as annotation. Sometimes, though, when you have
many labels, some will be unplaced and will not convert to placed
annotation. Next, you'll learn how to work with unplaced, or overflow,
annotation.
Step 5 Annotation overflow
Turn
labeling on for the Campgrounds layer.
Zoom to
the Mainland campgrounds bookmark.
If
necessary, zoom to the reference scale.
Step 5a: Annotation overflow.
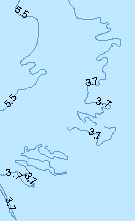
Look
carefully at the map and you'll see some conflicts between labels and the
campground features, especially near the bay in the southwestern portion of the
mainland. Prior to converting such a large number of labels to annotation, it's
a good idea to make sure the labels are as neatly placed as possible to avoid possible
confusion later.
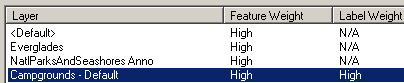
For best
placement of your labels, open the Label Weight Ranking dialog and set the
feature weight to High for the Campgrounds Default label class.
Step 5b: Annotation overflow.
View the
unplaced labels.
The labels
did shift, but there are still conflicts. You'll handle those conflicts after
the conversion.
Turn off
unplaced labels.
Convert
the labels for the Campgrounds layer to annotation. Store the annotation in the
map and create the annotation for features in the current extent.
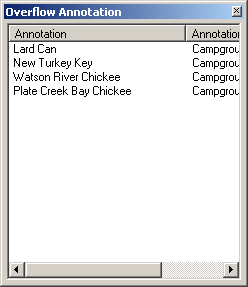
Once you
click Convert on the dialog, an Overflow Annotation window pops up showing the
annotation that did not draw on the map.
Step 5c: Annotation overflow.
Depending
on your monitor size and display settings, your results may differ.
Tip: If you close the Overflow Annotation
window, you can re-open it from the View menu.
If
necessary, drag the Overflow Annotation window to the side to avoid obscuring
the campgrounds.
![]() 3 What is the name of the new annotation
group?
3 What is the name of the new annotation
group?
q CampgroundsAnno
q Campgrounds Anno
q MainlandCampgroundsAnno
q Mainland Campgrounds Anno
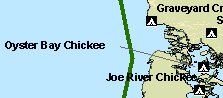
In the
Overflow Annotation window, right-click Watson River Chickee
then click Flash Feature. You see the feature on the
north side of the bay that lies left of the
![]() Don't see Watson River Chickee
in the Overflow Annotation window?
Don't see Watson River Chickee
in the Overflow Annotation window?
Depending on your display settings and map
extent, you may see different overflow annotation.
Follow the instructions using the overflow
annotation on your list.
Right-click
the white area of the Overflow Annotation window and choose Draw Annotation.
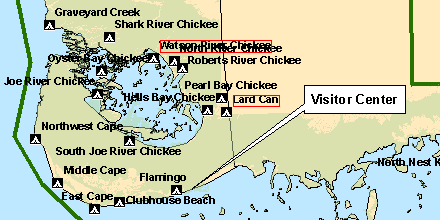
Step 5d: Annotation overflow.
Each of
the overflow annotation draws inside a red outline. This is analogous to
viewing unplaced labels and makes it easier for you to see all the unplaced
annotation at the same time.
In the
Overflow Annotation dialog, right-click Watson River Chickee
again and choose Add Annotation.
Reposition
the annotation you just added as well as some of the nearby annotation to avoid
conflicts.
![]()
Step 5e: Annotation overflow.
Use the
same process to add the remaining overflow annotation to the map.
For
clarity, after you add each annotation, adjust its location or that of
neighboring annotation to avoid conflicts. You can use the Identify tool ![]() to double-check which feature goes with a
particular label.
to double-check which feature goes with a
particular label.
If
necessary, move the
Close the
Overflow Annotation window.
Each
annotation now displays near its feature.
The
annotation for Oyster Bay Chickee is somewhat
obscured by the detail in the northwest portion of the bay. You'll create a
simple callout for this annotation.
With the
Select Elements tool, double-click Oyster Bay Chickee
then click Change Symbol.
Click
Properties then, on the Advanced Text tab, check Text Background and click
Properties.
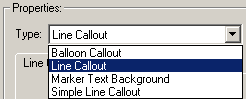
From the
Type dropdown list, choose Line Callout.
Step 5f: Annotation overflow.
Uncheck
Accent bar and Border.

Step 5g: Annotation overflow.
Click OK
to close all dialogs.
Drag the
callout into the water area on the west. Move the anchor point nearer to the
campground location then unselect the callout.
Step 5h: Annotation overflow.
![]() What is a chickee?
What is a chickee?
Several of the campgrounds contain the word "chickee" in their names.
The Seminole and Miccosukee
tribes of
So far in
this course, you've added descriptive text as dynamic labels and as map
document annotation to your map.
How can
you share map document annotation with others? Because map document annotation
is a property of the map document, you can share it by making copies of the
ArcMap MXD. You'll also want to include the other feature data you've already
created and positioned in the annotation for anyone else who wants to use it.
In the
next step, you'll add descriptive text to a layout.
Step 6 Add text to
a layout
You have
used the text tools on the Draw toolbar to add and modify map document
annotation. In this step, you'll use the same text tools to add and modify
descriptive text on a layout.
Toggle to
Layout View.
On the
Layout toolbar, click Focus Data Frame ![]() .
.
Step 6a: Add text to a layout.
A hatched
outline appears. You're now working inside the data frame.
The button
remains depressed and acts as a toggle.
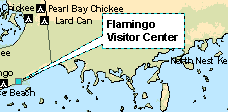
A parks
department employee reviewed your map and mentioned that because the visitor
center is located near the Flamingo campground, the center shares the same
name. So you'll update the text for the visitor center.
Select the
Step 6b: Add text to a layout
Toggle to
Data View to verify your change.
As you've
just discovered, when the layout has focus, you can modify map document
annotation. If you guessed that you can also create map document annotation
when the layout has focus, you'd be correct.
Next, you
will add some additional text to describe the map.
Return to
Layout View.
Click
Focus Data Frame.
Step 6c: Add text to a layout.
Now you
see a solid line around the layout. You're no longer working inside the data
frame.
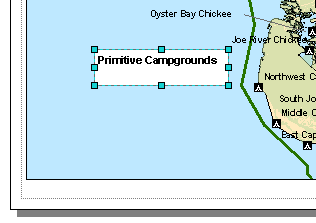
On the
Draw toolbar, click New Rectangle Text ![]() .
The New Rectangle Text tool allows you to create a paragraph, or block, of text
inside a graphic.
.
The New Rectangle Text tool allows you to create a paragraph, or block, of text
inside a graphic.
Click in the
blue area just west of the bay and drag a rectangle. Change the text to Primitive
Campgrounds.
Use the
tools on the Draw toolbar to change the font to size 12, bold.
Choose a
white fill color.
If
necessary, resize the rectangle to display the complete line of text.
Step 6d: Add text to a layout.
Toggle to
Data View.
Where are
the rectangle and text that you just added? When the layout does not have
focus, you can only add graphic text. Graphic text is created in page
units (inches, centimeters), unlike labels and map document annotation, which
are created in geographic units. The Primitive Campgrounds text is graphic text
and is stored only with the layout properties.
Step 7 Save your work
Save your
map document as final_Everglades.mxd.
In this
exercise you used text tools to create descriptive text on both the map and the
layout.
You
created map document annotation from two types of input and processed overflow
annotation.
Dynamic
labels, map document annotation, and graphic text offer distinct options for
placing descriptive text and you understand the uses and benefits of each.
Part
II: Create map document annotation
During the
past few centuries, sailing vessels have sunk in
The
tourism department wants to create maps, suitable for printing, of the
Your task,
as the GIS analyst, is to create a unified map that includes the Keys and
shipwrecks. Because the map will be printed, you'll annotate, rather than
label, the features.
Estimated
time to complete: 30 minutes
Step 1 Start ArcMap and open the map
document
If
necessary, start ArcMap.
Navigate
to your Lab14 folder and open SouthFlorida.mxd.
Step 1: Start ArcMap and open the
map document.
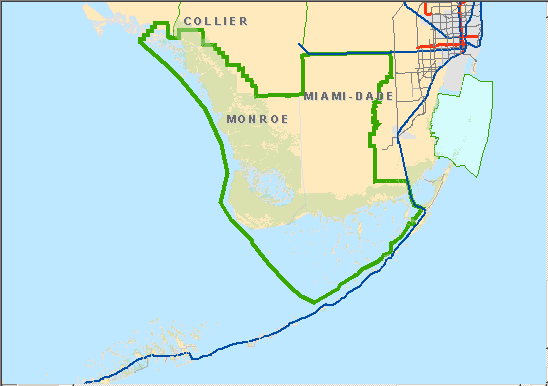
You see
the southern tip of
Step 2 Create standard annotation for the
Keys
You may
remember from the first labeling exercise that the
If
necessary, maximize your ArcMap window.
Zoom to
the
Open the
Label Manager and examine the properties for the Mainland and Keys label
classes in the Counties layer.
Turn on
labeling for Keys then click OK.
If
necessary, set the scale on the Standard toolbar to 1:400,000. This will
be the reference scale for the annotation.
Step 2a: Create standard annotation
for the Keys.
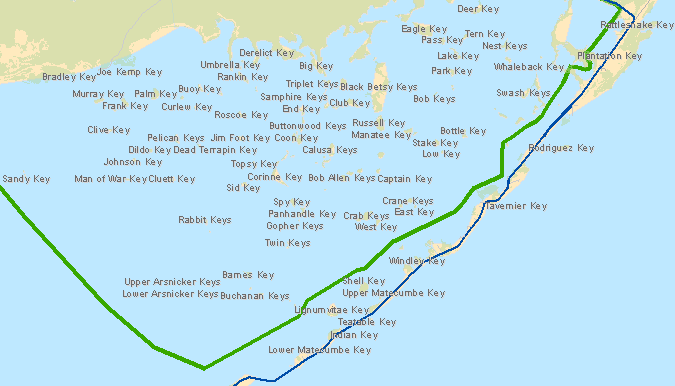
You see
labels for many of the islands of the
In this
step, you will convert the labels to standard annotation rather than map
document annotation. Standard annotation resides in the geodatabase.
Click Convert
Labels to Annotation.
In the
Convert Labels to Annotation dialog, in the Store Annotation pane, make sure In a database is selected.
Note: The conversion will use the data frame reference scale, if set,
otherwise it uses the current reference scale for the map.
Choose to
create annotation for features in the current extent.
Step 2b: Create standard annotation
for the Keys.
If
necessary, uncheck Feature Linked.
Note: The Feature Linked option is enabled only for ArcInfo and ArcEditor licenses.
If you are using one of these licenses, you need to uncheck Feature Linked to
ensure that your results match those provided in the exercise.
Notice
that, by default, ArcMap concatenates 'Anno' to the
feature layer name to create the name for the annotation layer. You will accept
the default name.
![]() 4 How does this default name compare with the
default name for map document annotation?
4 How does this default name compare with the
default name for map document annotation?
Note: Notice the Append checkbox. Append lets you add annotation to an
existing annotation feature class. For example, after you convert labels for
features in one extent, you can pan to another extent and convert labels in
that extent to the same annotation feature class.
The
Destination window near the bottom of the dialog shows you the location of the
output annotation. You see the name of the geodatabase
and the name of the new annotation feature class.
Make sure
the Convert unplaced labels to unplaced annotation option is checked.
Click
Convert.
In the
next step, you'll examine the characteristics of your new annotation layer.
If you are
an ArcEditor or ArcInfo
user, go to Step 4.
Step 3 Examine the annotation layer (ArcView users)
ArcMap
automatically adds the new standard annotation layer to the Table of Contents.
Step 3a: Examine the annotation
layer (ArcView users).
Notice the
Default annotation class. Both label classes converted to a single annotation
class named Default.
Right-click
Default and choose Properties.
On the
General tab, examine the scale range. The scale range was inherited from the
first label class, Mainland.
![]() 5 Why is there no Default label class?
5 Why is there no Default label class?
Although,
you can modify the scale range on this tab, you'll clear it another way.
Right-click
Default, point to
Right-click
Default again and choose Properties.
Click the
Annotation Class tab.
Step 3b: Examine the annotation
layer (ArcView users).
Notice the
sample text that illustrates the font characteristics. Because two label
classes merged into a single annotation class, you see the sample for Mainland,
the label class that appeared first in the Label Manager. The Mainland
annotation features also appear first in the annotation attributes table.
Click Text
Symbol.
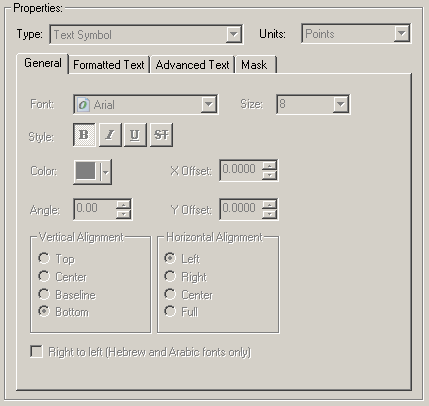
Step 3c: Examine the annotation
layer (ArcView users).
The
properties are all disabled because they are read-only in this dialog. Later,
you'll learn how to modify the text symbology.
Close the
windows.
The
annotation layer can be treated like any other layer, as far as the drawing
sequence is concerned. You can move it wherever you like in the Table of
Contents. Just be aware that other layers, such as those with polygon features,
can obscure annotation features.
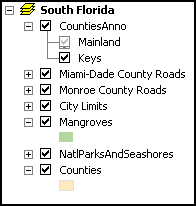
Drag the CountiesAnno layer to just above the Counties layer.
Next,
you'll become familiar with the attributes of an annotation layer. Like the
other layers in the Table of Contents, the annotation layer has an attribute
table.
Open the
attribute table for CountiesAnno.
Step 3d: Examine the annotation
layer (ArcView users).
All
attribute tables for annotation will contain the fields you see here. These
fields store values that enable ArcMap to draw the annotation text with the
properties you defined.
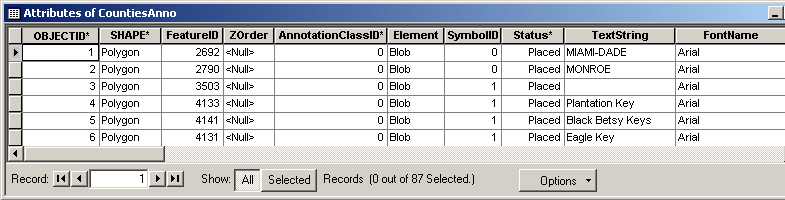
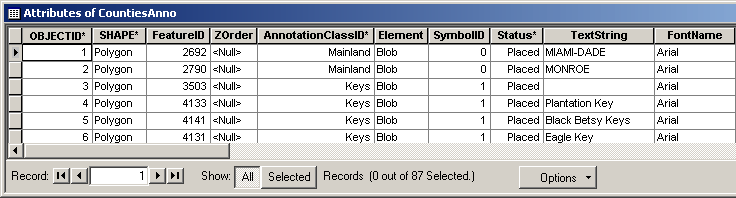
Scroll
down through the table and examine the contents of each field.
The AnnotationClassID field contains zeroes for all records
because the two label classes converted to a single annotation class.
![]() 6 Which field gives you a clue that you began
with more than one label class?
6 Which field gives you a clue that you began
with more than one label class?
q ObjectID
q SymbolID
q FontName
q TextString
The
properties of each annotation are stored collectively in the Element field as a
BLOB, a database term for Binary Large OBject. Do not
attempt to edit this BLOB field. This field updates automatically when you edit
other attribute values. You will edit some of these attributes later.
![]() 7 Which field tells you whether annotation is
unplaced?
7 Which field tells you whether annotation is
unplaced?
q Shape
q Element
q Override
q Status
You'll learn
more about unplaced annotation in the next part of this lab.
Close the
table window.
Read
through the instructions and open the View Result graphics for Step 4
Examine the annotation layer (ArcEditor and ArcInfo users) and think about the similarities and
differences with regard to standard annotation.
When
you're finished with Step 4, continue with Step 5 Convert coverage features
to geodatabase features where you'll learn how to
create annotation from another data source type.
Step 4 Examine the annotation layer (ArcEditor and ArcInfo users)
ArcMap
automatically adds the standard annotation layer to the Table of Contents.
Step 4a: Examine the annotation
layer (ArcEditor and ArcInfo
users).
Notice the
two annotation classes, Mainland and Keys. Each annotation class was created
from a label class.
Right-click
Keys then click Properties. On the General tab, notice the
Click the
Annotation Class tab.
Step 4b: Examine the annotation
layer (ArcEditor and ArcInfo
users).
Notice the
sample text that illustrates the font characteristics.
Click Text
Symbol.
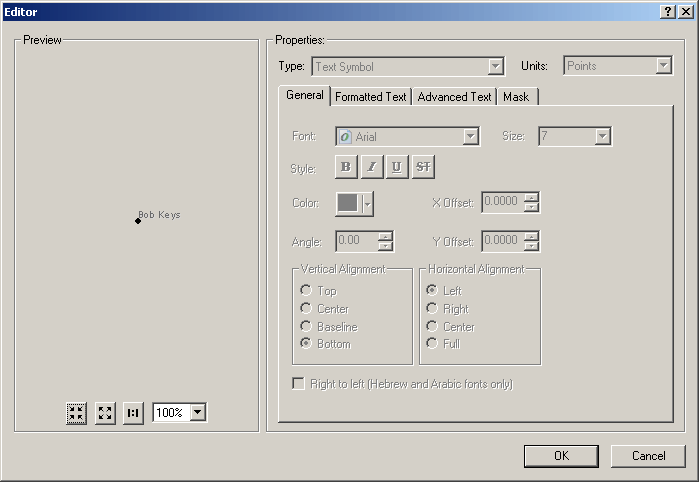
Step 4c: Examine the annotation
layer (ArcEditor and ArcInfo
users).
You see
the text symbol properties for the annotation class. The properties are all
disabled because they are read only in this dialog. Later, you'll learn how to
modify the text symbology.
Close the
properties windows.
The
annotation layer can be treated like any other layer, as far as the drawing
sequence is concerned. You can move it wherever you like in the Table of
Contents. Just be aware that other layers, such as those with polygon features,
can obscure the annotation features.
Drag the CountiesAnno layer to just above the Counties layer.
Next,
you'll become familiar with the attributes of an annotation layer.
Like the
other layers in the Table of Contents, the annotation layer has an attribute
table.
Open the
attribute table for CountiesAnno.
Step 4d: Examine the annotation
layer (ArcEditor and ArcInfo
users).
Annotation
attribute tables will contain the fields you see here. These fields store
values that enable ArcMap to draw the annotation text with the properties you
defined.
Scroll
down through the table and examine the contents of each field.
![]() 8 Which fields imply you began with more than
one label class?
8 Which fields imply you began with more than
one label class?
q SymbolID and TextString
q SymbolID and AnnotationClassID
q TextString and AnnotationClassID
q SymbolID and Status
The
properties of each annotation are stored collectively in the Element field as a
BLOB, a database term for Binary Large OBject. Do not
attempt to edit this BLOB field. This field updates automatically when you edit
other attribute values. You will edit some of these attributes later.
Close the
table window.
Before you
proceed with the remainder of the exercise, read through the instructions and
open the View Result graphics for Step 3 Examine the annotation layer (ArcView users) and think about the similarities and
differences with regard to standard annotation. Then, return here to continue
with the remainder of the exercise.
In the
next step, you'll learn how to create annotation from another data source type.
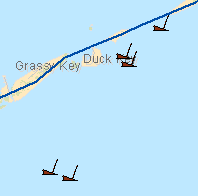
Step 5 Convert coverage features to geodatabase features
You're now
ready to include the shipwrecks data you received from the maritime history
department. First, you'll examine the file format.
Open
Windows Explorer.
Navigate
to your lab folder and expand its subfolders.
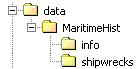
Step 5a: Convert coverage features
to geodatabase features.
You
recognize that the shipwrecks data does not reside in a geodatabase.
The file format was provided to you as an ArcInfo
coverage so you'll need to convert the data into a format you can use.
Zoom to
the Shipwrecks bookmark.
Click the
Add Data button ![]() and navigate to the MaritimeHist
folder.
and navigate to the MaritimeHist
folder.

Step 5b: Convert coverage features
to geodatabase features.
Double-click
the shipwrecks coverage.
Select point
then press and hold the Ctrl key on your keyboard while you select annotation.name. Click Add.
The
shipwrecks point features and the ships' names display in ArcMap.

Step 5c: Convert coverage features
to geodatabase features.
The text
is huge relative to your map. You'll modify the text symbology in the next
step.
For now,
turn off annotation.name.
Next,
you'll export the points to a geodatabase feature
class.
Click the
shipwrecks point layer so it is the only selected layer.
Right-click
the shipwrecks point layer, point to Data then click Export Data.
Use the
same coordinate system as the data frame.
In the
Export Data window, click the Browse button.
In the
Saving Data dialog, click the Save As type arrow, then
click Personal Geodatabase feature classes. Navigate
to the data\SouthFlorida.mdb\SunkenVessels
feature dataset in your lab folder.
For Name,
type Shipwrecks.
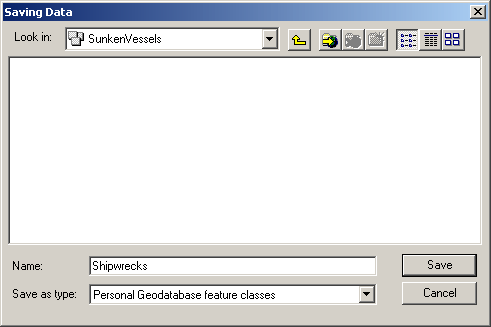
Step 5d: Convert coverage features
to geodatabase features.
Click
Save, then click OK. Click Yes when prompted to add
the layer to the map.
Remove the
shipwrecks point layer from the ArcMap Table of Contents.
Step 5e: Convert coverage features
to geodatabase features.
Open the
properties for the Shipwrecks layer then click the Symbology tab. You'll use a
symbol from the Environmental style.
In the
Layer Properties dialog, click the symbol in the Symbols pane.
In the
Symbol Selector, click More Symbols. Locate and click Environmental on the list
provided.
Note: If Environmental already appears near the top of the list and it
is checked, you do not need to click it because it is already loaded.
Choose the
symbol Sinking Vessel, Wreck (left) from the symbols on the left.
Change the
symbol color to a dark red, such as Cherry Cola (fifth row, third column in the
color picker).
Change the
size to 12.
Click OK
to close both the symbology dialogs.
Step 5f: Convert coverage features
to geodatabase features.
Now that
you have the point features loaded, you're almost ready to load the annotation.
But, first you'll modify the text symbology.
Step 6 Examine coverage annotation
Open the
attribute table for the annotation.name layer.
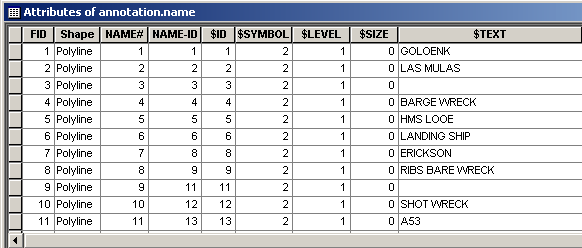
Step 6a: Examine coverage
annotation.
Examine
the fields. One field name contains a pound sign (#) while others begin with a
dollar sign ($).
Coverage
annotation features store certain characteristics in pseudo items. Pseudo items
are similar to attribute fields and begin with a $ symbol. Their values can be
used to manipulate characteristics such as size, symbol, offset distances, and
text characters.
![]() 9 Which field stores the names of the ships?
9 Which field stores the names of the ships?
q Text
q $SYMBO
q $TEXT
q $ALIGN
Notice the
$SYMBOL field contains the value 2. You'll use this information when you change
the font.
Close the
attribute table.
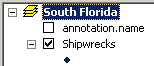
Turn on annotation.name.
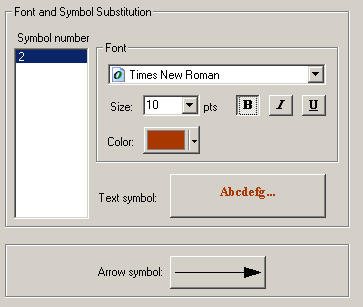
Open the
properties for annotation.name and click the Symbols
tab.
Under
Symbol number, click 2. This is the value for $SYMBOL in the attributes table.
Notice the
font is currently set to Arial.
![]() ArcInfo workstation
fonts
ArcInfo workstation
fonts
AGFA Intellifonts font types
that are used by ArcInfo workstation coverages need to be converted to a TrueType or OpenType font equivalent available in Microsoft Windows. In
Workstation ArcGIS, the font was defined as Univers
Medium which, by default, is mapped to Arial. If you don't like the ArcGIS
default mapping, you can manually set the font.
Change the
font to Times New Roman, size 10, bold.
For Color,
choose Cherry Cola, the same dark red color you used for the shipwreck symbols
(fifth row, third column of the color selector).
Step 6b: Examine coverage
annotation.
Click OK.

Step 6c: Examine coverage
annotation.
The font,
color, and size changed according to your settings.
![]() How does the $SIZE pseudo item affect font
size?
How does the $SIZE pseudo item affect font
size?
The layer annotation.name
contains the $SIZE pseudo item. When the value for $SIZE is non-zero, you
cannot change the font size for the coverage annotation layer in ArcMap. The
annotation size in the coverage can be changed only in Workstation ArcInfo. However, after you convert the coverage annotation
to geodatabase annotation, you can change the font
size for the geodatabase annotation in ArcMap.
When $SIZE equals 0, then the font size for the coverage
annotation can be modified in ArcMap. For the annotation coverage used in this
exercise, $SIZE was set up ahead of time to equal 0.
You will need to decide how you want to process $SIZE as
you develop a migration strategy for converting your coverage data to the geodatabase.
Now you're
ready to convert the coverage annotation layer to annotation in your geodatabase.
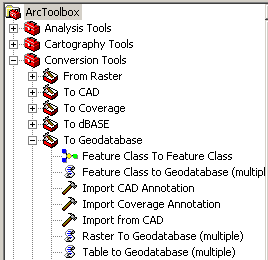
Step 7 Import coverage annotation
Unlike the
coverage points that you exported to the geodatabase,
coverage annotation requires a different conversion process. You'll use one of
the geoprocessing tools in ArcToolbox.
For more information on ArcToolbox, refer to the
ArcGIS Desktop Help topic Welcome to ArcGIS Desktop Help.
Click the ArcToolbox button ![]() .
.
A dockable window opens, by default, between the Table of
Contents and the map.
Expand the
Conversion Tools toolbox then expand the To Geodatabase
toolset.
Step 7a: Import coverage
annotation.
Double-click
the Import Coverage Annotation tool.
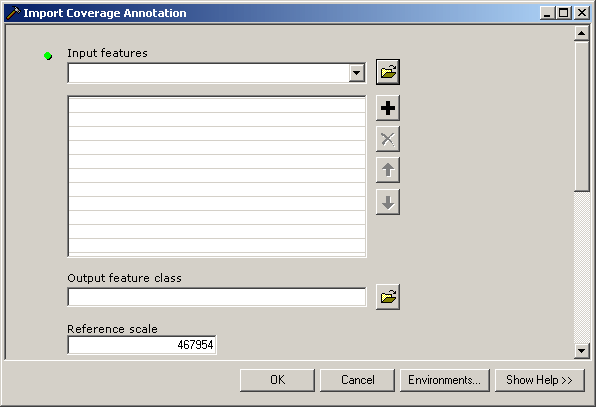
Step 7b: Import coverage
annotation.
From the
Input features dropdown list, select annotation.name.
For the
Output feature class, click the Browse button ![]() and navigate to the data\SouthFlorida.mdb\SunkenVessels feature dataset in your lab
folder.
and navigate to the data\SouthFlorida.mdb\SunkenVessels feature dataset in your lab
folder.
For Name,
type ShipwrecksAnno and click Save.
Scroll
down in the Import Coverage Annotation wizard so you can see the remaining
options.
Enter 400,000
for the reference scale.
If
necessary, uncheck Create annotation classes from levels (optional).
Note: This option is enabled for ArcEditor
and ArcInfo licenses only. Unchecking
this option will help ensure that your results match those provided in the
exercise.
![]() Annotation levels
Annotation levels
For annotation created in ArcInfo
workstation, levels are analogous to classes, somewhat like the label classes
you worked with earlier. Levels are numbered, for example, 1, 2, 3, etc. When geodatabase annotation classes are created from coverage
annotation levels, each level converts to an annotation class. The name of each
annotation class matches the level number.
Annotation created with ArcView
will have a single annotation class named Default.
Click OK.
The Import
Coverage Annotation dialog appears.
After the
process completes, close the Import Coverage Annotation dialog.
Notice the
new geodatabase annotation feature class is
automatically symbolized and added to the Table of Contents.
Close ArcToolbox.
Remove the
annotation.name coverage annotation from the Table of
Contents.
Open the ShipwrecksAnno attribute table and scroll to the right.
The
conversion process updated the table with geodatabase
annotation fields as well as the old pseudo items, without the leading $.
![]() 10 Which field contains the names of the
ships?
10 Which field contains the names of the
ships?
q AnnotationClassID
q TEXTSTRING
q FeatureID
q XOffset
Close the
attribute table.
Right-click
the Default annotation class and choose Properties to view the properties of
the new annotation class.
![]() What if I see 2 instead of Default?
What if I see 2 instead of Default?
The 2 tells you two things:
1.
You
are using ArcEditor or ArcInfo,
and
2.
In
the Import Coverage Annotation wizard, you did not uncheck Annotation class
from levels.
All annotation in annotation.name
layer is in Level 2. Just treat the 2 annotation class as if it were the
Default annotation class. You can right-click and rename it, if you'd like.
Close
Layer Properties dialog.
Zoom to a
map scale of 1:400,000, the scale you set during the import process.
You decide
the annotation is still too large, resulting in some overlap of features and
annotation. You want to see how a smaller font size affects the new annotation,
but you don't want to make a permanent change to the attributes.
For
temporary changes, you can use symbol substitution. These changes are stored
with the map document rather than in the geodatabase.
Open the
properties for ShipwrecksAnno then click the
Symbology tab.
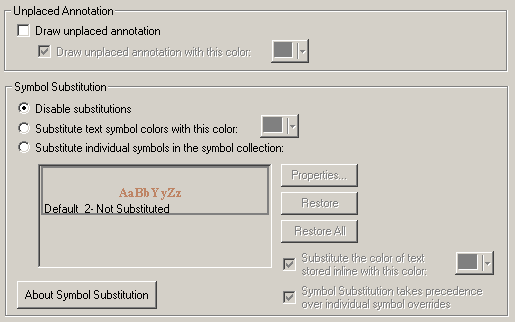
Step 7c: Import coverage
annotation.
Click About Symbol Substitution to learn more. Close the window
when you're finished.
In the
Symbol Substitution pane, click Substitute individual symbols in the symbol
collection then click Properties.
In the
Symbol Selector, change the font size to 8.
Click OK
to close the dialogs.
Step 7d: Import coverage
annotation.
You can
see that smaller annotation does eliminate some of the overlapping.
In the
next exercise, you'll discover how to make permanent changes to geodatabase annotation.
Step 8 Save your work
Save the
map document in your Lab14 folder as
final_SouthFlorida.mxd.
In this
exercise you added geodatabase annotation to your
repertoire of storage options for descriptive text.
You used
one of the geoprocessing tools available in ArcToolbox to import ArcInfo
coverage annotation.
By
examining the content of annotation attribute tables, you learned that the type
of data converted to annotation determines the format of the table fields.
You
understand that the ArcGIS software license you use (e.g., ArcView,
ArcEditor, or ArcInfo)
affects the output when creating standard annotation.
Part
III: Edit annotation
As the new
GIS technician for the natural resources department, you've inherited a project
(an ArcMap document and a geodatabase) from your
predecessor. Your task is to finish updating the geodatabase
with accurate and descriptive annotation so the data can be shared with the
tourism department.
Estimated
time to complete: 40 minutes
Step 1 Start ArcMap and open the map
document
If
necessary, start ArcMap.
Navigate
to your Lab14 folder and open ReefTours.mxd.
Step 1: Start ArcMap and open the
map document.
You see
southern
Step 2 Convert map document annotation to
standard annotation
You'll
begin by analyzing the descriptive text to determine its format.
If
necessary, maximize the ArcMap window for a closer look at the text.
Zoom to
the
Step 2a: Convert map document
annotation to standard annotation.
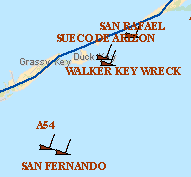
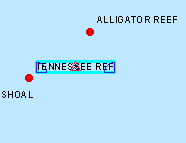
Right away
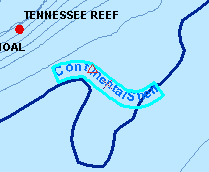
you spot a misspelled name just off center in the map.
![]()
Ref should
be Reef.
You decide
to work with the reefs data first, but you need to know the type of descriptive
text. You notice the Table of Contents contains an annotation layer for the
Continental Shelf, but you don't see an annotation layer for reefs.
![]() 11 Which of the following trouble-shooting
techniques may be used to determine the type of descriptive text for the reefs?
11 Which of the following trouble-shooting
techniques may be used to determine the type of descriptive text for the reefs?
q Open the Label Manager and confirm whether
the Reefs layer is checked.
q Use the Select Elements tool
![]() .
.
q Examine data frame properties for annotation
groups.
q All of the above.
Determine
the type of descriptive text that labels the reefs.
![]() 12 What is the descriptive text for the reefs?
12 What is the descriptive text for the reefs?
q Dynamic labels
q Geodatabase
annotation
q Map document annotation in the Default
annotation group
q Map document annotation in the Reefs Anno annotation group
Because
one of your goals is to provide a geodatabase to the
tourism department, you'll begin by converting the map document annotation to
annotation in a geodatabase.
Turn off
visibility for all layers except Reefs.
In the
first exercise, you converted map document annotation from one annotation group
to another. Prior to doing that you needed to create a new annotation group to
receive the text. This time, to convert map document annotation to the geodatabase, you'll need a new annotation feature class for
the conversion. You wonder whether your colleague might have created one
already.
Click the
Add Data button ![]() and navigate to your data\SouthFlorida.mdb
geodatabase within your Lab14 folder.
and navigate to your data\SouthFlorida.mdb
geodatabase within your Lab14 folder.
Open the Coast
feature dataset.
You're in
luck! Your colleague has already created an annotation feature class named ReefsAnno.
Add ReefsAnno to your map.
Determine
the reference scale for this annotation feature class then set the data frame
reference scale to match it.
![]() 13 What is the reference scale for ReefsAnno?
13 What is the reference scale for ReefsAnno?
q 1:400,000
q 1:650,000
q 1:857,228
q 1:20,000
Step 2b: Convert map document
annotation to standard annotation.
Note: Once the data frame reference scale is set, it will be used for
the conversion regardless of the current extent.
Open the
data frame properties and make sure that both the Default and Reefs Anno annotation groups are checked. Click OK to close the
dialog.
In order
to update the ReefsAnno annotation class, you'll need
to start an edit session. To edit annotation, you'll work with two toolbars.
Turn on
the Editor and Annotation toolbars.
From the
Edit menu, choose Select All Elements. You see dashed lines around all the
reefs annotation.
From the
Editor menu, choose Start Editing.
From the
Drawing menu, set the Active Annotation Target to ReefsAnno.
![]() Make sure you choose the geodatabase
feature class. It will not have a space in its name.
Make sure you choose the geodatabase
feature class. It will not have a space in its name.
From the
Edit menu, choose Cut, then, again from the Edit menu, choose Paste.
The
annotation shifted to the right, so while all the annotation elements are still
selected, you can reposition them as a group. Using the Select Elements tool ![]() ,
drag them slightly to the left, nearer to the point features. Use TENNESSEE REF
as your guide. You don't need to be too precise.
,
drag them slightly to the left, nearer to the point features. Use TENNESSEE REF
as your guide. You don't need to be too precise.
Step 2c: Convert map document
annotation to standard annotation.
From the
Editor menu, choose Save Edits.
Click the
display to remove the selection outlines.
Open the data
frame properties and remove the Reefs Anno annotation
group.
In the
ArcMap Table of Contents, turn ReefsAnno off and on
to confirm that you moved the annotation successfully to this annotation
feature class.
Do not
stop editing because in the next step, you'll correct the spelling error.
Step 3 Edit annotation attributes
While
you're still editing, you'll update the Tennessee Ref annotation with the
correct spelling.
On the
Editor toolbar, click the Edit tool ![]() then select the Tennessee Ref point feature.
then select the Tennessee Ref point feature.

Step 3a: Edit annotation attributes.
On the
Editor toolbar, click the Attributes button ![]() .
.
Step 3b: Edit annotation
attributes.
In the
right-hand panel, click TENNESSEE REF, the value for NAME.
Correct
the spelling to
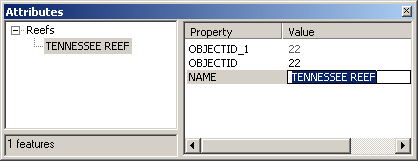
Step 3c: Edit annotation
attributes.
Close the
Attributes window.
Save your
edits.
To check
your work, turn off the Reefs and ReefsAnno layers
then turn them on again to refresh the display.
Did the
annotation change? The annotation feature has not been updated. In this case,
there is nothing in the geodatabase that connects, or
links, the annotation to the feature. If you want to keep the annotation data
synchronous with the feature data, you'll need to edit the annotation, too.
You'll do that next.
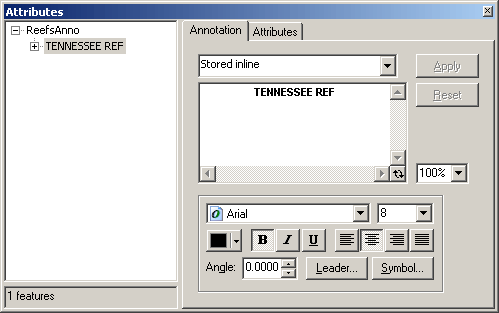
Click the
Edit Annotation tool ![]() then click the Tennessee Ref annotation
feature.
then click the Tennessee Ref annotation
feature.
Step 3d: Edit annotation
attributes.
The
annotation is highlighted and the two rotation handles, the red resize handle,
and the selection handle appear.
Right-click
the annotation then click Attributes.
Step 3e: Edit annotation
attributes.
In the
window that opens, make sure the Annotation tab is selected. The annotation
displays as formatted text, appearing as it would on the map.
In the
lower right corner of the formatted text window, click the Refresh button ![]() to toggle to the unformatted text.
to toggle to the unformatted text.
Correct
the spelling to
Toggle to
the formatted text to check the results.
Click the
Attributes tab.
Notice the
value for the TextString attribute has updated with
your change.
You can
make your modifications to annotation any one of three ways:
- to the formatted text on the
Annotation tab
- to the unformatted text on the
Annotation tab
- to the TextString
attribute value on the Attributes tab
Close the
Attributes window.
Save your
edits.
Turn on
all layers.
Click the
blue area of the display to clear the selection.
You've
completed some of the editing, but you notice the tight curve in the line
feature for the Continental Shelf and want to adjust the annotation so it better
fits the curve. You'll do that in the next step.
Step 4 Edit positioning of annotation
In this
step, you'll reposition annotation for a line feature layer.
Zoom to
the Continental Shelf bookmark.
With the
Edit Annotation tool ![]() ,
select the annotation feature near the U shape.
,
select the annotation feature near the U shape.

Step 4a: Edit positioning of
annotation.
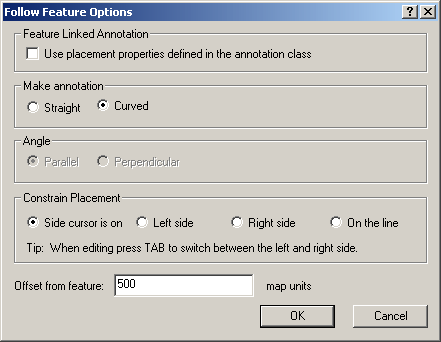
Right-click
the selection, point to Follow, then choose Follow
Feature Options.
In the
dialog that opens, for Make annotation, choose Curved.
For
Constrain Placement, choose Side cursor is on.
For Offset
from feature, enter 500. This will offset the annotation from the line
feature by 500 meters.
If
necessary, uncheck the Use placement properties option at the top of the
dialog.
Step 4b: Edit positioning of
annotation.
Click OK.
Move your
mouse pointer over the U-shaped line feature near the Continental Shelf
annotation feature. Right-click then choose Follow
This Feature.
The line
feature flashes and the annotation curves to follow the line.
Step 4c: Edit positioning of
annotation.
Place the
mouse pointer over the annotation feature. The pointer will change to the
four-pointed Move Annotation pointer.
Step 4d: Edit positioning of
annotation.
Click and
drag the Continental Shelf annotation feature along the line feature and
position it just below the U shape. Notice how the annotation closely follows
the curve.
Step 4e: Edit positioning of
annotation.
Drag the
annotation so that it lies in a smoother location, just above the line and to
the left of the U.
Step 4f: Edit positioning of
annotation.
Place the
mouse pointer over the red triangle. The pointer will change to the two-pointed
Resize Annotation pointer.
Click and
drag the resize handle upward to slightly increase the size of the annotation.
Stop
editing and save your edits.
In the
next step, you'll make the descriptive text for the Bathymetry layer more
informative.
Step 5 Set up labeling properties
In this
step, you'll customize a label expression.
Turn on
labeling for Bathymetry.
Step 5a: Set up labeling
properties.
Just by
viewing the descriptive text for the Bathymetry layer, you're unable to
determine whether the values measure water depth in feet, meters, or even
fathoms. You notice that some of the values have decimals and some do not. The
bathymetry line features seem to bleed through the labels, garbling the text.
You want to resolve all of these issues, if possible, without editing any
attributes.
In the
Label Manager, open the Expression for the Bathymetry layer's Default label
class. Based on the "M" in the label expression, you deduce that the
label represents the depth in meters.
Because
you're working with labels, you can create a custom label expression for the
Bathymetry layer and verify your results before converting to annotation.
To clarify
the units of measure, concatenate " M" after
the depth. You did this in an earlier exercise.
Verify the
expression.

Step 5b: Set up labeling
properties.
Next,
you'll use ArcGIS text formatting tags to make each value bold. The ArcGIS text
formatting tags adhere to XML syntax rules, so each start tag must be
accompanied by an end tag. For bold, the start tag is <BOL> and the end
tag is </BOL>. Each tag is surrounded by quotes.
Build (or
copy and paste) the following label expression:
"<BOL>"
& [DEPTH_M] & "</BOL>" & " M"
Note: Be sure you place the "M" for meters outside the bold
formatting tags.
Verify
your code.
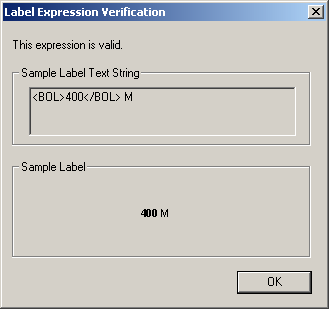
![]() 14 Which of the following displays as the
Sample Label Text String?
14 Which of the following displays as the
Sample Label Text String?
q 400.5 M
q 400.5 M
q <BOL>400.5</BOL> M
q <BOL>400.5</BOL> M
Notice the
Sample Label Text String includes the tags and differs from the Sample Label.
Now, to
complete the expression, you'll use the VBScript Round function to round all
the values to the nearest whole number.
Edit your
label expression to read as follows:
"<BOL>"
& Round([DEPTH_M], 0) &
"</BOL>" & " M"
To learn
more about the Round function, refer to the ArcGIS Desktop Help under Contents
> ArcMap > Working with text > About building
label expressions.
![]() 15 What is the purpose of the 0 in your label
expression?
15 What is the purpose of the 0 in your label
expression?
To round all numbers to multiples of 10.
To round the field DEPTH_M to 1 decimal place.
To
round the field DEPTH_M so it has no decimal places.
By
design, it's a placeholder.
Verify the
expression.
Step 5c: Set up labeling
properties.
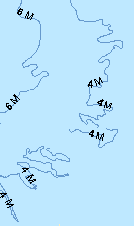
The
numeric portion of the label expression displays in bold while the M draws with
the regular font.
Click OK
to close the Label Expression dialog and the Label Manager.
Step 5d: Set up labeling
properties.
The labels
are easier to read, but the bathymetry line features still interfere with them.
Next,
you'll mask the labels so the lines of bathymetry don't show through the
text. A mask will surround each bathymetry annotation value and will need to be
the same color as the background color. In the map document for this exercise,
the background color is a property of the data frame. In other map documents,
you might choose the symbol color from a polygon layer for the background.
Open the
properties for the Coral Reefs data frame and click the Frame tab.
Step 5e: Set up labeling
properties.
In the
Background pane, click the arrow next to Color.
![]() 16 What is the background color of the map?
16 What is the background color of the map?
q Apatite Blue
q Atlantic Blue
q Sodalite Blue
q Sugilite Sky
Remember
the location in the color selector. This is the color you will use to mask the
lines in the Bathymetry layer.
Click
Cancel to close the data frame properties.
Open the
Label Manager.
For the
Bathymetry Default label class, click the Symbol button in the Text Symbol pane
to open the Text Symbol properties.
In the
Symbol Selector, click Properties.
Examine
the text string in the Preview Pane. Currently, labels for bathymetry draw as
regular text. Next, you'll apply a halo to obscure the line feature the lies
underneath the label.
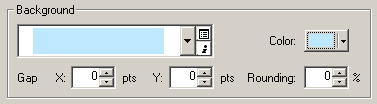
Click the
Mask tab then click Halo.
The
preview updates to reflect your change.
Click
Symbol.
Change the
Fill Color to Sodalite Blue.
Change the
Outline Width to 0.
Click OK
to close the dialogs and return to the Label Manager.
Step 5f: Set up labeling
properties.
The sample
label in the Text Symbol pane reflects your changes.
Click OK
to apply your changes and close the Label Manager.
The
bathymetry labels are easier to read now that there is less interference from
the bathymetry lines.
![]() Another
way to hide features (ArcInfo only)
Another
way to hide features (ArcInfo only)
Variable-depth masking is another technique for
hiding undesired features in several layers at once. You already know that if
you add a zoning polygon layer and a streets line layer to the Table of
Contents then drag the polygon layer so it draws after the streets, some
streets will be obscured.
The same concept applies to variable-depth masking.
You can create a layer of polygons based on a layer
of annotation where each polygon is the shape of a piece of annotation. In the
Table of Contents, position the annotation layer to draw after the
polygon layer. The annotation will draw and the polygons will obscure all
features in all layers that are underneath the polygons.
Note: This functionality is available for ArcInfo.
Here's how you would use variable-depth masking with
your bathymetry lines and annotation.
The following instructions assume you have already
created an annotation layer.
Create the masking layer
1.
Open
ArcToolbox
2.
Expand
the Cartography Tools toolbox.
3.
Expand
the Masking Tools toolset.
4.
Double-click
the Feature Outline Mask tool.
5.
Click
the Input Layer dropdown list and select your annotation layer, e.g., BathymetryAnno.
6.
For
the Output Feature Class, accept the default.
7.
Enter
400 for the Margin.
8.
Click
the Margin dropdown arrow and select Meters.
9.
Click
OK.
Use the masking layer
1.
If
necessary, add the polygon masking layer you just created to your ArcMap Table
of Contents.
2.
Change
the symbol to Sodalite Blue, with no outline.
3.
Right-click
the data frame in the Table of Contents then click
Advanced Drawing Options.
4.
Check
Draw using masking options specified below.
5.
In
the left pane, click the polygon masking layer.
6.
In
the right pane, check the layers you want to have affected by the mask in the
Masked Layers list, e.g., Bathymetry.
7.
In
the table of contents, drag the masking layer below Reefs.
8.
Click
OK.
For more information, refer to the ArcGIS Desktop
Help under Contents > ArcMap > Symbolizing your data > Working with
variable-depth masking.
As part of
the conversion process, you want to make your labels as stationary as possible.
If you find that your converted annotation has been placed in completely
different locations than the labels, experiment with their Label Weight Ranking.
Set the
Label Weight Ranking for the Bathymetry Default label class to High. Set all
other Label Weight ranks to Low. Set all Feature Weight ranks to None.
In the
next step, you'll convert your bathymetry labels to geodatabase
annotation.
Step 6 Convert labels to annotation
Zoom to
the reference scale for the data frame.
Tip: Once you have set the reference scale for the data frame, you
can zoom to a different extent prior to converting the labels and they will
still be converted at the reference scale of the data frame.
Convert
the Bathymetry labels to annotation. Choose the options to convert features in
the current extent to annotation in a database.
If
necessary, uncheck Feature Linked.
Step 6a: Convert labels to
annotation
Click
Convert.
The new
annotation layer is added to the Table of Contents.
Open the
attribute table for the newly created BathymetryAnno
annotation feature class.
Step 6b: Convert labels to
annotation.
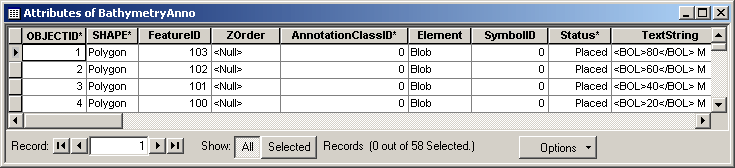
Examine
the TextString field. Remember the Sample Label Text
String when you verified the formatting tag in Step 5? Formatting tags are not
limited to label expressions. Text formatting tags are stored with the text in
the TextString attribute.
Note: One advantage of setting up the formatting tags in the Label
Expression is the ability to verify your results. However, you can also edit
the annotation attributes table and include formatting tags when you update the
TextString field.
Close the
attribute table.
Masking is
indiscriminate and will obscure all layers that draw prior to the bathymetry
layer. Visibility of some features may be partially or totally blocked by the
masks. As you create maps, you will be faced with conflicts like this and will
need to decide which layers take precedence. When you work with masks on an
annotation layer, however, you can reposition the layer in the Table of
Contents for a more pleasing appearance.
Drag BathymetryAnno just below Reefs in the Table of Contents.
In the
next step, you'll find out whether you have any unplaced annotation.
Step 7 Process unplaced annotation
In this
step, you'll examine the unplaced annotation and will place the annotation in
the map. To examine the unplaced annotation, you'll need to start an edit
session.
Start
Editing.
On the
Annotation toolbar, click the Unplaced Annotation Window button
![]() .
.
Step 7a: Process unplaced
annotation.
Note: If you've docked the annotation toolbar horizontally, you've
probably noticed that it is very wide. Depending on the size of your window,
you may need to float and resize the toolbar in order to see the Unplaced
Annotation Window button.
![]() What's the difference between unplaced
annotation and overflow annotation?
What's the difference between unplaced
annotation and overflow annotation?
In a previous exercise in this lab, you encountered overflow
annotation, which is map document annotation that ArcMap couldn't fit on
the map.
When you are working with geodatabase
annotation, the annotation that won't fit on the map is called unplaced
annotation.
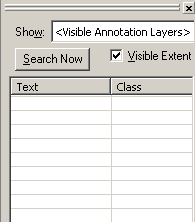
In the
Unplaced Annotation window, check Draw.
Tip: The Draw checkbox appears on the right side of the window.
Resize the window, if necessary, to find the checkbox.
Click
Search Now.

Step 7b: Process unplaced
annotation.
You see a
list of the unplaced annotation. The Text column contains the actual text for
the annotation, while the Class column shows your annotation layer and
annotation class. If necessary, widen the Class column.
Don't
worry if your table of unplaced annotation differs from the View Result
graphic.
In your
map, notice that each unplaced annotation now draws inside a red rectangle.
This is analogous to viewing unplaced labels. You can see where the annotation
is destined to draw.
Step 7c: Process unplaced
annotation.
Tip: For a larger map window, close the Table of Contents. You can
re-open it later.
Right-click the first row in the Unplaced Annotation window. Click Pan to annotation.
Click the
same annotation in the first row in the Unplaced Annotation window.
Notice the
red box that flashes once on the map to demonstrate where the annotation will
be placed.
Press and
hold the Shift key on your keyboard then click the last of the Bathymetry
unplaced annotation in the Unplaced Annotation window to select all features.
Right-click
the list and choose Place annotation.
All of the
Bathymetry annotation is placed at the same time.
Close the
Unplaced Annotation window.
Step 7d: Process unplaced
annotation.
The newly
placed annotation features are all selected in the map.
With the
Edit Annotation tool ![]() ,
click the map to unselect the annotation features.
,
click the map to unselect the annotation features.
If you
closed the Table of Contents, from the Window menu, choose Table of Contents to
open it again.
As you
learned in the last lab, dynamic labels for an entire label class are either
placed or they are unplaced. The only way to delete a dynamic label is to
delete its feature. In this step, you discovered that you can control the
annotation feature or features that will be placed.
Both the
Bathymetry annotation and Reefs annotation draw in black. You'd like a better
color contrast between the two. When you're editing, you can change the font
color for one feature or for many features.
Next,
you'll change the font color for all of the bathymetry features.
Select all
the Bathymetry annotation features. Hint: Because your annotation is a feature class, you can
right-click the feature class in the Table of Contents, point to Selection, and
choose Select All.
On the
Editor toolbar, click the Attributes button ![]() .
.
In the
tree, select BathymetryAnno.
If
necessary, click the Annotation tab.
Change the
color to a deep blue, such as Ultra Blue (fifth row, tenth column of the color
selector).
If you
don't see the color selector, resize the attributes window until you see the
pane that holds the font controls.
Click
Apply then close the attributes window.
Note: You can also click the Attributes tab and make global updates to
all features in the annotation class.
Save your
edits but do not stop editing.
Clear all
selected features.
In the
next step, you'll create new annotation using the editing tools.
Step 8 Add new annotation
In an
earlier exercise, you created annotation for a national park visitor center.
That annotation was not based on an attribute and was saved with the map
document. You can also create geodatabase annotation
that is not based on an attribute.
You want
to create descriptive text for the
You can
choose to store your new annotation in one of the existing annotation feature
classes or create a new one. For now, you'll use an existing feature class.
Zoom to
the Continental Shelf bookmark.
On the
Editor toolbar, change the Target dropdown list to ContinentalShelfAnno.
![]()
Step 8a: Add new annotation.
ArcMap
recognizes that you will be editing annotation and enables several tools on the
Annotation toolbar.
On the
Annotation toolbar, click Construct Straight Annotation ![]() .
.
The
Construction dropdown list automatically changes to Straight.
![]()
Step 8b: Add new annotation.
In the
Text window, enter
Click in
the blue area below the Continental Shelf annotation.
Move your
mouse pointer parallel to the Continental Shelf feature.
Click the
map to stop the rotation.
Click the
Edit Annotation tool to terminate adding the annotation text then click the red
triangular resize handle and drag the annotation to increase its size.
![]() View shortcut keys for these kinds of editing
tasks
View shortcut keys for these kinds of editing
tasks
ArcMap provides a number of shortcut keys for editing on
the Annotation toolbar.
|
Annotation toolbar shortcut keys |
|
|
Shortcut key |
Editing function |
|
Ctrl |
Move
selection anchor |
|
Shift |
Add
to/remove from selection |
|
N key |
Select
next annotation |
|
R key |
Enter/exit
rotate mode |
|
F key |
Enter/exit
follow feature mode |
|
L key |
Flip
annotation |
|
O key |
Follow
feature options |
|
P key |
Toggle
annotation placement angle between parallel and perpendicular when in Follow
Feature mode |
|
Tab |
Switch
to the other side of line while in follow feature mode |
|
E key |
Toggle
between Sketch tool, Edit tool, and Edit Annoation
tool |
Stop
editing and save your edits.
Step 8c: Add new annotation.
Turn ContinentalShelfAnno off and on to check your work.
Step 9 Save your work
Navigate
to your Lab14 folder and save your map as final_ReefsTours.mxd.
![]() Challenge: Modify the
Challenge: Modify the
Use text formatting tags to modify the
When faced
with the task of converting descriptive text of unknown origin to geodatabase annotation, you used your trouble-shooting
skills to determine the type of text. Once you identified the format, you knew
how to convert the text.
In this
exercise, you used advanced techniques to enhance labels prior to converting
them to annotation. You also worked with geodatabase
editing tools to modify annotation attributes and positions.
Part
IV: Edit annotation
The city
of
All
students will be able to work the first two exercise steps. ArcView
students will benefit by reading through the instructions and examining the
View Result graphics for the remainder of the exercise even though actually
working those exercise steps requires ArcEditor or ArcInfo software.
Estimated
time to complete: 20 minutes
Step 1 Start ArcMap and open the map
document
If
necessary, start ArcMap.
Navigate
to your Lab14 folder and open HistoricTours.mxd.
Step 1: Start ArcMap and open the
map document.
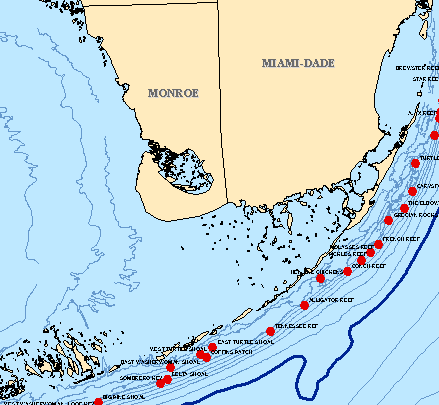
The map
opens to several historic buildings against a backdrop of local streets and
major roads in the eastern neighborhoods of
Step 2 Explore annotation class properties
In this
step, you'll examine the properties for an existing feature-linked annotation
feature class.
You may
have noticed when you first opened the Historic Tours map document that the
visibility of the annotation layer is scale dependent. Each annotation class
can have its own range for visible scale.
For Major
Roads Annotation, open the properties for the Interstate annotation class.
If
necessary, click the General tab. The visible scale range displays in the
properties for the Interstate annotation class.
Click the
Annotation Class tab. A sample text symbol displays.
The
properties for feature-linked annotation include the SQL query that was used to
select the geometric features for which the annotation was created. In
addition, the properties include the expression that determines the value of
the text string for the annotation.
Examine
the properties for the remaining annotation classes.
![]() 17 Which of the annotation classes has no SQL
query?
17 Which of the annotation classes has no SQL
query?
q Default
q Interstate
q
q County Road
If
necessary, maximize the ArcMap window to view the Major Roads annotation.
Zoom to
the Walking Tours bookmark.
Step 2: Explore annotation class
properties.
Step 3 Convert labels to feature-linked
annotation
You'll
begin by labeling the historic structures so you can quickly convert them to
annotation.
Turn on
labeling for Historic Structures.
Turn off
labeling for Counties.
Set the
map scale to 1:15,000.
Set the
data frame reference scale.
Step 3a: Convert labels to
feature-linked annotation.
Many
labels overlap point features and other labels so you'll want to do what you
can to minimize conflicts prior to converting to annotation.
Open the
Label Weight Ranking dialog and change the Feature Weight for the Historic
Structures Default label class to High. A High rank for a point feature class
will assure that labels will not overlap the points.
Click OK.
Step 3b: Convert labels to
feature-linked annotation.
You will
need ArcEditor or ArcInfo
software to work the remainder of this exercise. ArcView
users can learn more about feature-linked annotation by reading the
instructions and opening the View Result graphics for the following steps.
![]() Is converting to standard annotation an
option?
Is converting to standard annotation an
option?
ArcView users can convert to standard
annotation. Just be aware, though, that the instructions and View Result
graphics that follow are based on feature-linked annotation and, in many cases,
will differ from those for standard annotation.
Next,
you'll convert the labels for the Historic Structures features in the current extent
to annotation in a geodatabase.
Right-click
Historic Structures and choose Convert Labels to Annotation.
Because
you want to create feature-linked annotation, make sure Feature Linked is
checked. If you had wanted to create standard annotation as you did before, you
would leave the Feature Linked box unchecked.
![]() What if the Feature Linked option is disabled?
What if the Feature Linked option is disabled?
The Feature-linked option will be disabled if you are not
using an ArcEditor or ArcInfo
license.
Notice
that Append is disabled. Append functionality, which allows you to create
standard annotation and add it to an existing standard annotation feature
class, is only available when Feature Linked is unchecked.
The
destination near the bottom of the dialog indicates that, just as it does for
standard annotation, ArcMap automatically places feature-linked annotation in
the same geodatabase location as the geometric
feature class.
Click
Convert.
Note: If your organization has a mix of ArcGIS licenses (i.e., ArcInfo, ArcEditor, and ArcView) you need to remember that ArcView
users will be unable to edit any data in a feature dataset that contains
feature-linked annotation or other types of relationship classes. ArcView users, however, can add feature-linked layers to
their ArcMap documents and access feature-linked annotation as read-only data.
![]() Another way to create feature-linked
annotation
Another way to create feature-linked
annotation
If you want to create feature-linked annotation for
selected features, you can use the built-in command Annotate Selected Features.
This is a custom button, accessed from the Customize dialog,
that you can add to the Feature Layer Context Menu.
In the
next step, you'll search for unplaced annotation.
Step 4 Handle unplaced annotation
In order
to view the unplaced annotation, regardless of whether you're working with
standard annotation or feature-linked annotation, you'll need to be in an edit
environment.
If
necessary, turn on the Editor and Annotation toolbars then zoom to the
reference scale.
Start
editing.
Open the
Unplaced Annotation window and search for unplaced annotation.
Resize the
Unplaced Annotation window so you can see all three columns: Text, Class, and
FID Linked.
Step 4a: Handle unplaced
annotation.
The FID
Linked column contains the Feature ID of the historic structure point feature
that is related to an annotation feature.
In the
table, click the first annotation to see the potential location of the
annotation feature will flash on the map.
If
necessary, float the Unplaced Annotation window and move it until you can see
the unplaced annotation on the map.
In the FID_Linked column, click the FID value for the annotation.
The point feature that is linked to this annotation flashes in the display.
At a
glance, you are able to visually associate the location of a point feature with
its corresponding annotation feature.
Select and
place all of the unplaced annotation then close the Unplaced Annotation window.
Because
you now have an annotation feature class, you are able to edit the placement,
orientation, and attributes of the annotation features. While you could
reposition the annotation with its current symbology to make the text more
readable, you will create callouts instead.
On the
Editor toolbar, click the Attributes button ![]() .
.
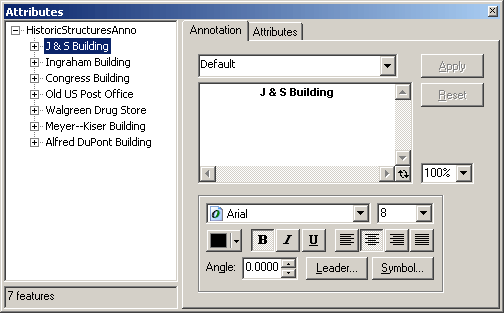
Step 4b: Handle unplaced annotation.
The tree
on the left shows all the selected annotation. Expand the tree for the
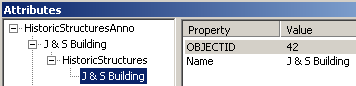
Step 4c: Handle unplaced
annotation.
In the
right-hand panel, the value for Name is the current value that displays as the
annotation for
You want
to modify the symbology for the newly placed annotation so that it can be
easily distinguished from the other annotation. Rather than edit each
annotation individually, you'll assign a new symbol to all of the selected
annotation at the same time.
In the
tree, click HistoricStructuresAnno. Make sure the
Annotation tab is selected.
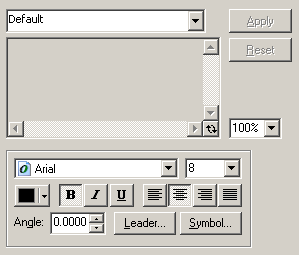
Step 4d: Handle unplaced
annotation.
Click
Leader then create a line callout.
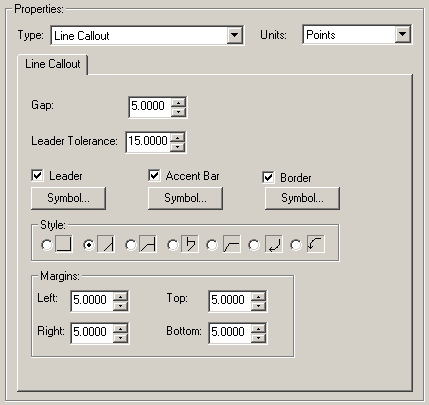
Step 4e: Handle unplaced
annotation.
Uncheck
Accent Bar and Border.
Click OK
to close the dialog.
In the
Attributes window, click Apply then close the window.
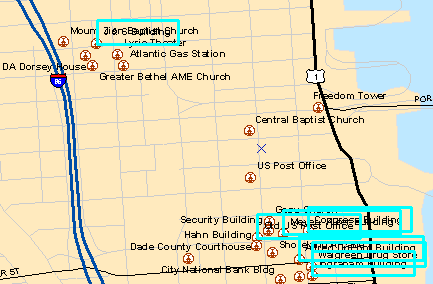
Step 4f: Handle unplaced
annotation.
The
annotation has now been placed on the map and is selected. The annotation still
conflicts with other annotation so you'll need to reposition the newly placed
annotation.
Click the
Edit Annotation Tool ![]() then click one of the selected annotation
features and drag it upwards and to the right until all the selected annotation
features are clear of the original placed annotation.
then click one of the selected annotation
features and drag it upwards and to the right until all the selected annotation
features are clear of the original placed annotation.
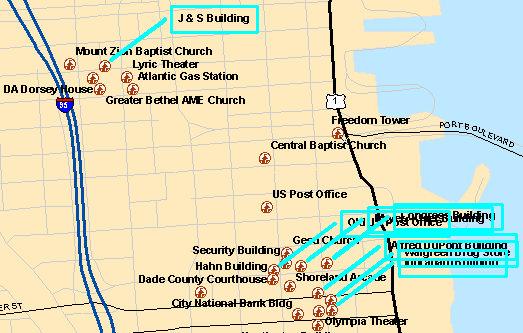
Step 4g: Handle unplaced
annotation.
Unselect
the annotation.
Reposition
the new annotation, if necessary, to avoid overlaps.
Once
you're satisfied with the placement, save your changes.
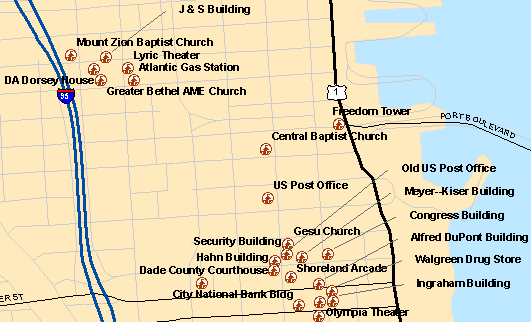
Step 4h: Handle unplaced
annotation.
The above
View Result graphic represents one possible configuration; yours may be
different. There is no need to match the graphic exactly.
In the
next step, you'll edit one of the historic structures.
Step 5 Edit features and annotation
A
community redevelopment project is underway and the preservation society has
notified you that the Palm Cottage structure was recently moved from its
original site to a new location. You need to update your map to reflect this
change.
In the
prior step, you created feature-linked annotation. With feature-linked
annotation, when you move a geographic feature, its annotation moves with it.
Locate the
Palm Cottage feature in the southern portion of the current extent.
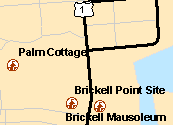
Step 5a: Edit features and
annotation.
Click the
Edit tool ![]() then select the point that represents Palm
Cottage (not the annotation).
then select the point that represents Palm
Cottage (not the annotation).

Step 5b: Edit features and
annotation.
Move the
point slightly to the east, positioning it just north of Brickell
Point Site.
Release
the mouse.
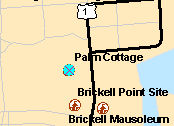
Step 5c: Edit features and
annotation.
Notice the
annotation followed the point. When you edit a geometric
feature that is feature-linked to annotation, the annotation moves along with
the feature.
Next,
you'll edit the Name attribute for the feature Palm Cottage.
On the
Editor toolbar, set the Target to Historic Structures then click the Attributes
button ![]() .
.
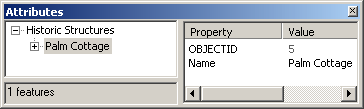
Step 5d: Edit features and
annotation.
For the Name property, click in the Value column. Change the value to Palm Cottage New
Site.
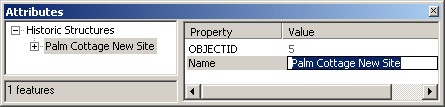
Step 5e: Edit features and
annotation.
Expand the
tree.
Click HistoricStructuresAnno.
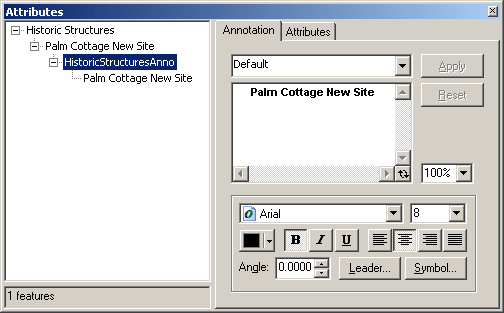
Step 5f: Edit features and
annotation.
The
formatted annotation is displayed using the font defined for the Default
annotation class.
Close the
Attributes window.
You have a
couple of additional changes to make. To begin, a recent hurricane so heavily
damaged one of the historic structures, that the building was later demolished.
You will need to delete the feature from the map.
Step 6 Delete a feature
With the
Edit tool, click the point feature for the
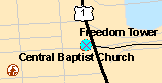
Step 6a: Delete a feature.
Click the
Delete button on the Standard toolbar.
Step 6b: Delete a feature.
Because
the annotation is linked to the feature, the annotation is simultaneously
deleted.
Next,
you'll add a feature for a structure that the preservation society just
designated as historic.
Step 7 Add a new feature
Your final
edit involves adding a new point feature with annotation. The historic
structure is located in the vicinity of the
On the
Editor toolbar, make sure Target is set to Historic
Structures.
Click the
Sketch tool ![]() then click the map between the
then click the map between the
Step 7a: Add a new feature.
Open the
editor Attributes window.
Change the
value for the Name field to Old Biscayne Bank and press Enter.
Close the
attributes window.
Because
the annotation is linked to the feature, the annotation appears immediately on
the map.
Use the
Edit tool ![]() to move the annotation slightly to the right
to eliminate the overlapping conflict with the point.
to move the annotation slightly to the right
to eliminate the overlapping conflict with the point.
Step 7b: Add a new feature.
Stop
editing and save your changes.
Zoom to
the Walking Tour bookmark.
Step 7c: Add a new feature.
Step 8 Save your work
Navigate
to your Lab14 folder and save your
map document as final_HistoricTours.mxd.
In this
exercise, you discovered that an ArcEditor or ArcInfo license is required for creating and editing
feature-linked annotation. You also learned that ArcView
users can add feature-linked annotation to their ArcMap documents and view the
data.
You found
out that moving a feature that is linked to annotation will result in the annotation
tagging along to the new location, while deleting a feature that is linked to
annotation will also delete the annotation.
Annotation
helps viewers decipher a map. Strategically placed annotation clearly
identifies features on the map. Listed below are key points about annotation
that you should remember.
- You can modify annotation
properties, including the text itself as well as the font, color, and
size.
- Geodatabase annotation can be added to
ArcMap as a layer and can be edited.
- Dynamic labels save time when
creating annotation.
- Annotation can be stored in
two places: in a map document and in a geodatabase.
- Annotation can be derived from
a variety of data sources, including geodatabase
feature classes, ArcInfo workstation coverages, CAD files, and shapefiles.
- The ArcGIS software you use
determines the type of geodatabase annotation
you can create and edit.
- Groups and classes provide
ways to organize and manage annotation.
Dynamic
labels, map document annotation, graphic text, and geodatabase
annotation offer distinct options for placing descriptive text and each offers
unique uses and benefits. Use this table as a guide to compare and contrast the
features of the various text options.
|
Descriptive text in ArcGIS |
||||
|
|
Dynamic labels |
Map document annotation |
Graphic text |
|
|
Advantages |
Fast and
easy to create |
Feature
information |
Precise
placement |
|
|
|
Label
classes |
General
information |
General
information |
|
|
|
|
Precise
placement |
|
|
|
|
|
Annotation
groups |
|
|
|
|
|
|
|
|
|
How to create |
Label
Manager |
Draw
tools |
Draw
tools |
|
|
|
Data
View |
Layout
(in focus) |
Layout
(no focus) |
|
|
|
|
From
labels |
|
|
|
Storage |
Generated
dynamically from label properties |
MXD |
MXD |
|
|
|
Label
properties saved in MXD or LYR |
|
|
|
|
|
|
|
|
|
|
Source of text string |
Attribute |
Attribute
or user input |
User
input |
|
|
|
|
|
|
|
|
Reference |
Geographic
space |
Geographic
space |
Page
space |
|
Review
questions
1. Which
tools are used to modify a) map document annotation and b) geodatabase
annotation?
2. Where can you place annotation that identifies a polygon feature?
3. List the primary reasons for using geodatabase
annotation instead of dynamic labels.