Data Preparation
All too
often in
![]()
You can use geoprocessing
tools to prepare data for analysis.
Throughout
the rest of this course you will be working on a course project with the
objective of defining the habitat of the
Setting up your work environment
A key
characteristic of successful geoprocessing is
organization. Knowing ahead of time where the input data is stored and where
the new output datasets will be located will help expedite your workflow. You
can organize your data input and output locations by using or creating workspaces,
or containers for geographic data. A workspace can be a system folder, a geodatabase, or a feature dataset.
Workspace
organization not only standardizes the way you work, but also helps you protect
original data and better manage the results of geoprocessing.
You can use geoprocessing tools to create new
workspaces and migrate source datasets into them. You
might choose to create separate workspaces for intermediate data and final
data. The first thing you'll do for the lynx project is create workspaces.
Another way to organize your work environment is to isolate the geoprocessing tools you'll need for your project. You can
create a custom toolbox that contains only a subset of the many geoprocessing tools available to you, making your project
tools easily accessible by you as well as others you want to share your work
with. For the lynx project, you'll create and work with custom toolboxes that
will contain only the geoprocessing tools you need.
Organization considerations
Workspace
organization is the process of defining where your input and output data will
physically be located. It can be an ad hoc organization that you design for a
simple one-time project, or it can involve many people working together to
design an entire database. It all depends on the scope of your project.
For example, the workspace organization for a simple project might be
a geodatabase that contains almost everything,
including original data, final data, and toolboxes. The advantage of this type
of organization is that nearly everything you need for your project is stored in
one database. Scripts, however, cannot be stored in a geodatabase,
but they can be referenced by script tools that are stored in a geodatabase.
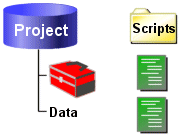
A geodatabase can hold all of your project data as well as
custom toolboxes. Scripts are stored in a separate system folder.
The single
geodatabase workspace makes it easy to share your
project with other people in your company. However, since you're only using one
container for your project, you have to pay special attention to managing geoprocessing results (the output data). A solid naming
convention is key.
![]() More about
naming conventions
More about
naming conventions
Establishing
a naming convention for data files is an important step that should take place
during the database design phase of a
If your
company has already established a naming convention for
You might
choose to incorporate dates, codes, initials, or iterations in your own naming
conventions.
Things to consider when establishing naming conventions:
· Don't use spaces in folder or file
names. Instead, use the underscore character ( _ ).
For example, use myveg_clip instead of myveg clip.
· Keep in mind that with some
operating systems, case-sensitivity can be a factor. For example, in a
case-sensitive context, MyVegLayer is a
different name than myveglayer.
· Use coded names during geoprocessing operations but more natural names for final
outputs. For example, vg_ap_cp_01 might be the name of an intermediate
data feature class, but the final output that you need for analysis could
simply be called vegetation.
ArcGIS geoprocessing
tools will usually apply a default name to output feature classes, but you can
change the output name to fit your own convention.
Another approach is to use system folders to define the
workspace organization. For example, you might create an upper level project
folder composed of subfolders. One subfolder could be designated for data, and
it might contain one or more geodatabases. Another
subfolder could be used to store custom toolboxes, while another could be used
to store scripts. Everything you need for your project is stored either in a
system folder or a geodatabase. In this way, you can
easily share either the whole project or individual pieces of it.
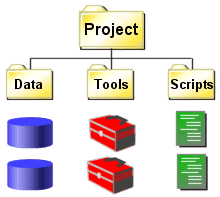
System folders can be used to organize multiple geodatabases, custom toolboxes, and scripts.